Sunday, October 23, 2011

More Crafting with Books! (And still w/only 1 Paperback!)

Honestly, only 1 book and I have more crafting to go! The first pb I ripped to shreds was "The Horse Whisperer". Nothing against the book itself--it was the right price and the cover will work for yet another project (to be revealed on another day).
This weekend, I worked on my ornaments and a plaque. Luckily, I had purchased just the right plaque at Salvation Army months ago! (For under $1!) I knew then that it would be repainted or re-surfaced, but I wasnt' sure at the time exactly how I would change it.


The ornaments started from crafting glass ornaments that I purchased at Micheals. A bit of Modge-Podge, glitter and glue and a few hours later...presto!
The plaque is simply pages from the book, letters I cut using the Cricket, and two of my "instant family" that I keep on hand.

Sunday, October 16, 2011

It's Almost Halloween!...and I'm carving "BOO"ks!

It almost seems strange that I would be carving books when my sister and her girls finished carving their pumpkins today. But then again, 'tis the life of a crafter...

In November, I'm presenting a "Friends of the Library" program on repurposing and crafting with books (book pages, book spines, maps etc.). I'm not shy about my love of cutting up pages and tearing about books, sorting scraps into piles and modge-podging them into new creations. (Someday I'll expound on my love of Dover paper dolls and the benefits of scissors-therapy.) Although typically, I've left this type of paper-crafting for my own, personal look-books and knicknacks. The "Friends" program is shaping up to be a bit more than I initially planned.
Which leads me to where I am now-- experimenting with some of the left-overs that I salvaged from the library book sale.

It took two tries at this "Golden Delicious" fall apple. Don't let the pictures fool you. A really good, new, sharp Exact is required and a bit of muscle doesn't hurt. I'm always thankful that my kitchen has one of those old, build-in cutting boards.


First, I found an image of an apple that I could easily half for my pattern. I split my paperback book into two sections. (About 150 pages each).
With my pattern on cardboard, I secured it to one half of the book with a thick binder clip.
Once the entire shape was cut away, I fanned the pages out, gluing and securing the ends together. I chose to used a yellow simply because I didn't have a red. (Next time!)
Finally, I glued in a piece of grape-vine and tied ribbon and netting for flare!


My primary resource for my most of my paper projects is the book I am using as reference during my "Friends of the Library" presentation. Playing with Books by Jason Thompson.

Saturday, September 24, 2011

And another Wreath!


Tried another wreath this evening. I used pages from my $600 Anne of Green Gables book (at least that was the value before I so enthusiastically tore the pages out!), a men's shirt, lace, odds-n-ends beads and one of my "instant family" portraits. The finished wreath is off-center, or -the way I see it- demonstrates my "learning curve"! I like where this one hangs in my back bathroom, so I'm thinking it will stay there for now.

Friday, September 23, 2011

Tearing Apart Books: Making Wreaths


Thank goodness I washed the dishes and cleaned the kitchen counter off so that I could make this wreath! With a few bits of paper scraps, old felted sweaters and help from good ol' Micheals, this beautiful wreath went together in no time. Idea "lifted" and inspired by this site's version: http://www.gracelaced.com/2011/01/13/diy-paper-and-grapevine-wreath/

Friday, July 29, 2011

Dryer Sheet Roses

I remember being in junior high, riding my bike from one small town to the next via country roads. On my typical path lived a elderly woman who had the most magnificant rose bushes. Each day, I'd see her out, "pruning" the bushes, so I thought. Then I was told, I'm not sure by who, or maybe I figured it out myself, that the roses weren't really roses at all. She had made each and every one of them and "hung" them out on the bushes every summer. Now, I'm not one for plastic flowers, but this amazed me. They were HAND MADE flowers.
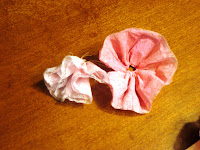
Last week, I tried my hand at coloring/painting dryer sheets to make my own roses. I soaked the used sheets in small tubs of acrylic/water and then hung them to dry. Yesterday, I took the sheets I had, cut them in half (lengthwise) and gathered them with thread and needle.


You can see the various color combinations I created on my first try. I would like to colorize a few more deeper shades of rose or bluish-red to finish the frame I am making.

Friday, July 22, 2011

Scratching the Itch (w/paintbrushes of course!)

What a find! Now...a theme...
Today I was thrilled to pick up these two at my local thrift store. Honest, my first thoughts were "photos". (I've spent the past two days away from the heat, in the comfort of air conditioning, cutting away at scrapbooking idea magazines!) But alas, I'm a gal who really likes to repaint, modge-podge, and collage away, so I'm focusing my creative energy on themes now. Vintage...definitely. Victorian...without a doubt. Story...either borrowed or my own. Photos? Epherma? Clipart? Glitter? Holidays?
I'm feeling a bit like Michelanglo on this one. Tonight I'll clean and prep the shadow boxes and then I'll work through it slowly and wait for the art inside to reveal itself to me. Along the way, I'll keep you posted on my progress.